Harvest is well underway across the Tuckwell territory. To help get the best from your John Deere combine, Sam Body, one of our agricultural demonstration team, offers some pointers for maintenance, set-up and operation.
Some daily items are easy to miss, so ensure before starting that the maintenance schedules listed in the operator’s manual are followed precisely, with all oil levels checked and greasing carried out according to the grease service chart. Blow down the combine thoroughly and regularly and follow the cleaning guide supplied with it. When blowing air filters clean, take care and use something that produces high volumes of air – such as a leaf blower – rather than a high pressure device that may damage the filter elements. When replenishing diesel and DEF/AdBlue tanks, ensure filling nozzles and areas surrounding the tanks are kept clean.
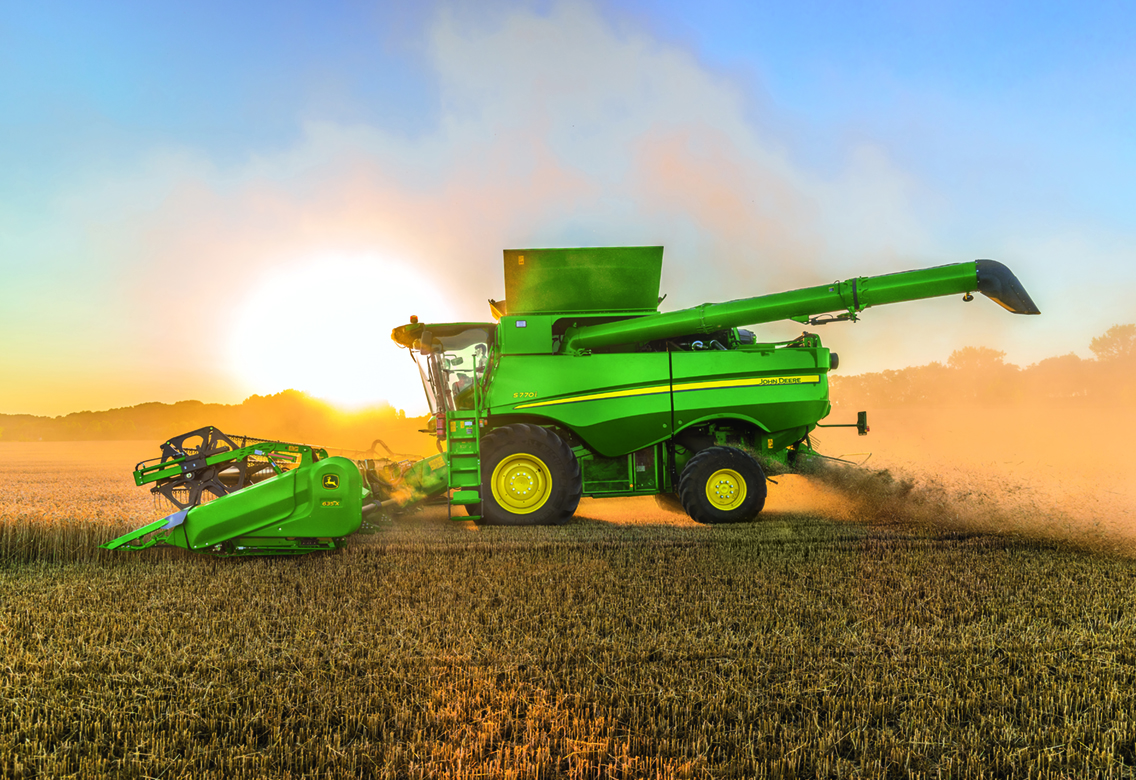
Before attaching the header, ensure the top of the elevator and the multi-coupler are clean to prevent contamination. Approach the header squarely with the combine. When locking the multicoupler with the handle, this will also engage the locking pins to secure the header. If the handle is hard to lock into place and the protective shearbolts break, there is a problem with header attachment and it should be repeated. On combines with X-series headers, carry out the header self-test when prompted by the GreenStar terminal.
On all current John Deere combines the fore/aft angle of the elevator front plate is adjustable – manually on T series models and hydraulically on S series machines – to allow the operator to ensure the header is parallel to the ground. In the right conditions it can be pitched slightly forward, reducing the need for lifters.
Check the auger height adjustment for crop cutting, the auger stripper plate adjustment on the rear of the header, and that the auger retractable finger adjustment is appropriate for the crop. There must be a minimum of 16mm clearance between the auger fingers and the bottom of the header.
In work, ensure reel speed is just slightly faster than forward speed. Reel tine angle can be adjusted from either end of the reel. The aim should be to ensure crop enters the elevator – and therefore the threshing drum – heads-first.
For best threshing performance, open the concave as much as possible until unthreshed heads are visible in the sample, and then close slightly. On newer T-series combines there is the option of engaging/disengaging a quick-engage threshing booster bar. As a general rule this is engaged unless split/cracked grains are visible, when it may be removed. With the booster bar installed, it is necessary to run a slightly wider concave setting. On older T-series models it is possible to retrofit a booster bar if required.
On rotary machines keep rotor speed high and retain that speed, then open the concave. If conditions allow, then slow the rotor speed. On S-series combines the separator vanes are adjustable between a standard position and an advanced one. In the latter the crop will make fewer passes around the rotor, potentially preferable where straw is to be baled.
If losses at the header appear high, ensure reel speed is not too fast and that the tines are just touching the crop ears. To ensure a consistent stubble height, reduce or increase header sensitivity values depending on ground conditions, forward speed and whether the combine is equipped with front tracks or tyres.
If experiencing high levels of returns, open the bottom sieve until trash appears in the sample and then close by one position. Check also that the top sieve is not set too far open and allowing too much material to fall on the bottom sieve.
If losses in the straw/chaff seem high, try to eliminate possible causes. Is the concave too open, the drum/rotor speed to low, or forward speed too fast? If it appears losses may be being incurred at the sieves, check that fan speed is neither too high nor low, and examine the chaff load the sieves are being required to handle to see if it can be reduced by fine-tuning the separator settings. Check the top and bottom sieves are open sufficiently, and fan pressure is not too high.
The most accurate way to create an A-B line is the straight track A + B method. This allows A and B points to be placed where required, such as with a tramline. Alternatively, where possible tramline headings can be transferred from the farm’s sprayer guidance terminal. If running two combines in the field, the first combine to create the line can provide the second with the heading of the line or the latitude/longitude coordinates of the A and B positions.
To ensure fields are cut in the most efficient way to minimise unnecessary travelling, make full use of guidance to enable block cutting. Ensure header width is correctly entered into the combine terminal with enough wiggle room in case the combine is sometimes not quite square when entering/exiting work.
Ensure forward speed is sufficient to keep the combine full – this will aid threshing and combine performance – but not so fast that losses are unacceptable.
At the end of the day, ensure data transfer is complete. On combines with GS4600/4640 terminals with up-to-date software, this will have happened regularly and automatically in conjunction with MyJohnDeere.com. For machines with GS2630 terminals, field data won’t be sent or saved until the field name is changed, which is the system’s signal to send the field data via wireless data transfer if this is enabled. Alternatively, inserting a USB stick into slot on the terminal will allow the data to be exported to the relevant profile name.
One final point – if switching off the isolator on the combine, wait a good few minutes after turning off the machine’s ignition before doing so. Don’t forget that staff from our sales and service departments at all depots will be happy to help with any combine set-up issues you may have.